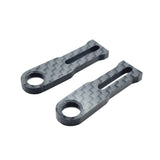
HORIZONTAL REAR POST BODY MOUNTING SET FOR ZOO/XTREME - LONG (39-46MM)
Horizontal Rear Post Body Mounting Set for Zoo/Xtreme - Long (39-46mm)
We are really excited to present our new revolutionary Body Mounting System for use with Horizontal Rear Body Posts!
The handling benefits of horizontal rear body posts are unquestionable. The downforce leveraged onto the back of the bodyshell creates significant benefits to handling, by increasing the downforce distributed to the chassis, as well as making the body more attached during left and right transitioning.
However, some major issues of this system are durability, stiffness and adjustability.
Durability: The holes are always close to the skirt, meaning it's quite easy to tear them out or damage the holes in even the smallest of accidents.
Stiffness: This area of the body is very thin and can flex under load, not as efficiently distributing the downforce.
Adjustability:The height adjustability of the body relies solely on the attachment to the chassis Which may not be in fine increments or easy to adjust.
Our new Horizontal Rear Post Body Mounting Set improves on ALL of these areas!
Durability is significantly increased, due to now not having any holes in the rear of the body at all. The connection is made via the 3mm thick carbon extension, which is connected to the wing strut, and is extremely rigid!
Stiffness is drastically improved now via the body being mounted to the car via a solid, extremely stiff combination of carbon fibre and plastic parts. This provides maximum downforce transfer to the rear of the car, ensuring the aerodynamics of the body is felt to its full potential
Adjustability is able to made in the smallest of increments, whilst having a total of 7mm of travel in each extension. Between the two different sizes of carbon extensions, there's a possible 14mm of travel. Simply loosen the screws, slide the carbon extension up or down and tighten. These screws tighten into steel nuts, providing absolutely no chance of movement or failure.
All of this provides you with an absolutely perfect solution to transfer the maximum amount of downforce to your car, whilst keeping the body more rigidly secured to the rear of your car than ever possible before. The assembly is very strong, ensuring you are able to stay on the track in crashes, and not having to replace bodyshells just because the holes have been damaged or torn out. The adjustability offered by these mounts is a necessity to be able to tune the rake and height of your body.
Our new Horizontal Rear Post Body Mounting Set can be transferred body to body, and securely attaches your wing, as well as bracing the wing strut do protect against deforming high speed and in crashes.
The best part is, it makes body mounting an absolute breeze! No more rear holes at all, simply get your front holes correct and screw the mounts on! We recommend using body pins either side of the carbon to ensure maximum rigidity, however in testing we found even without any body pins behind the carbon, the body posts never managed to escape the carbon.... we'll leave that one up to you!
We offer two different sets which include different lengths of extensions. To figure out which set is right for you, measure from the top of the wing strut to the centre of the holes in the rear of your body like the guide below. Choose a version that coincides with your measurement. We also have extensions available separately if you fall right in the middle or want even further adjustment!
Short Version: 32-39mm
Long Version: 39-46mm (This version)

Features:
- Improved downforce, durability, stiffness, appearance and adjustability
- Fits all Zoo Racing and Xtreme Bodies and all cars with 99-102mm post width (Xray, Awesomatix, Mugen, Yokomo (Not BD10LC) etc)
- Weight in at only 10g with all hardware!
- No holes required in the body for super easy body mounting
- 3D Printed and CNC Carbon construction with all hardware required included
- Pre Hand Assembled from our Factory
Installation instructions:
- Attach mounts into wing struts by inserting M3 nut in Slot (Supplied) and attaching your wing. It can be helpful to pre-thread your locknut so it doesn't spin in the mount upon first tighten. Make sure the offset carbon is facing outwards (wider)
- Loosen mounts and adjust to desired height. Ensure height is even left and right, and tighten. Do not over-tighten! The screws do not need to be super tight!
- Add body pins or adjusters to ensure there is minimal movement of the body back and forwards on the post once clips are installed.


